Brand and Campaign Registration process
- 17 Mar 2025
- 6 Minutes to read
- Contributors


- Print
- DarkLight
- PDF
Brand and Campaign Registration process
- Updated on 17 Mar 2025
- 6 Minutes to read
- Contributors
- Print
- DarkLight
- PDF
Article summary
Did you find this summary helpful?
Thank you for your feedback!
How to Register a Brand
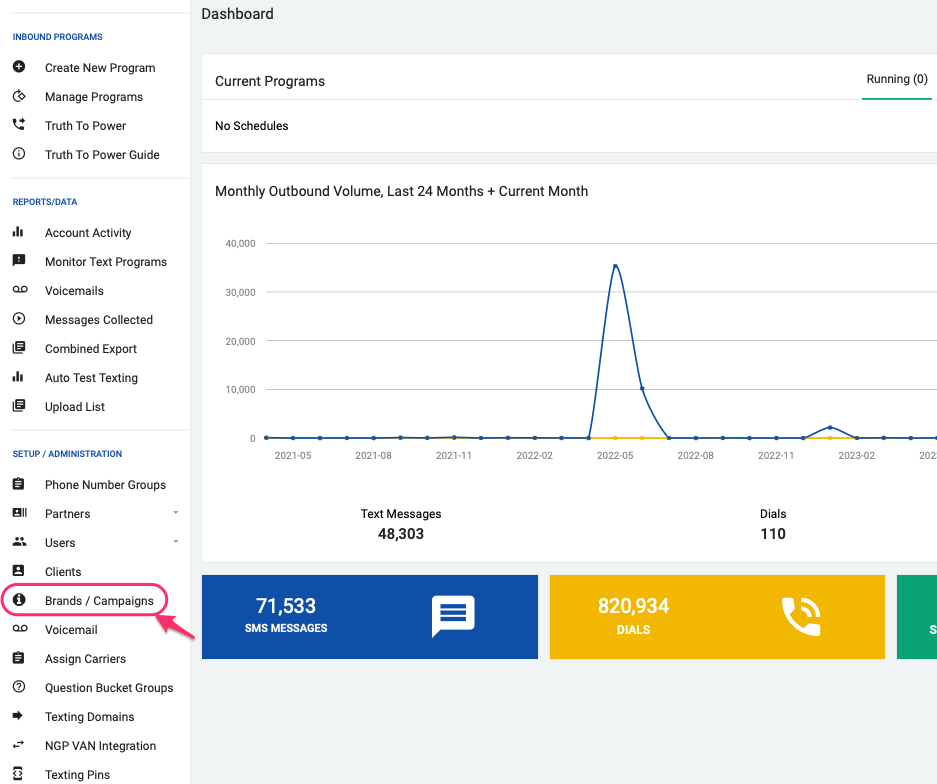
From the Dashboard, select the Brands/Campaigns link located in the left menu under the SETUP/ADMINISTRATION section.
Click on 'Create a Brand' to create a new brand or if you already obtained a CV token for this organization, you can click on 'Create a Brand With Campaign Verify Token' to automatically retrieve all the information needed for the Brand creation form (skip Step 3 from this guide).
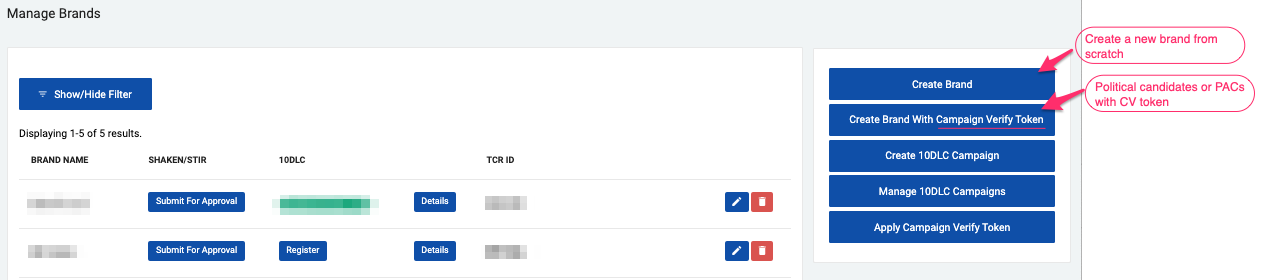


If the brand is already registered for Shaken/Stir, just click the blue 'Register' button under the 10DLC Column.

Note:
If this brand was previously submitted for Shaken/Stir (IVR) purposes, and you wish to update any of the information provided for the Shaken/Stir brand registration, please contact us at support@echo19.com before submitting the 10DLC brand for registration.
- Fill out the form with accurate and verifiable information that identifies the organization sending texts. If you don't have all the information available, you can save by clicking the 'Create' button at the end of the page and come back to it later.
All candidates, PACs and party committees can be classified as Nonprofit under the 'Entity Type' field.
Important Tips!
- Complete the 'Entity' fields using the organization's information exactly as it appears in their EIN letter (Organization's name and address).
- Website, phone and email. Use the email and phone published on your website at the contact page or footer. Discrepancies may cause delays during the brand review.
- The brand's authorized representative(s) may be contacted at any time for identity verification and to attest that the SMS texts sent on their behalf are legitimate.
- Save the information entered by clicking the 'Create' button located at the bottom of the form.
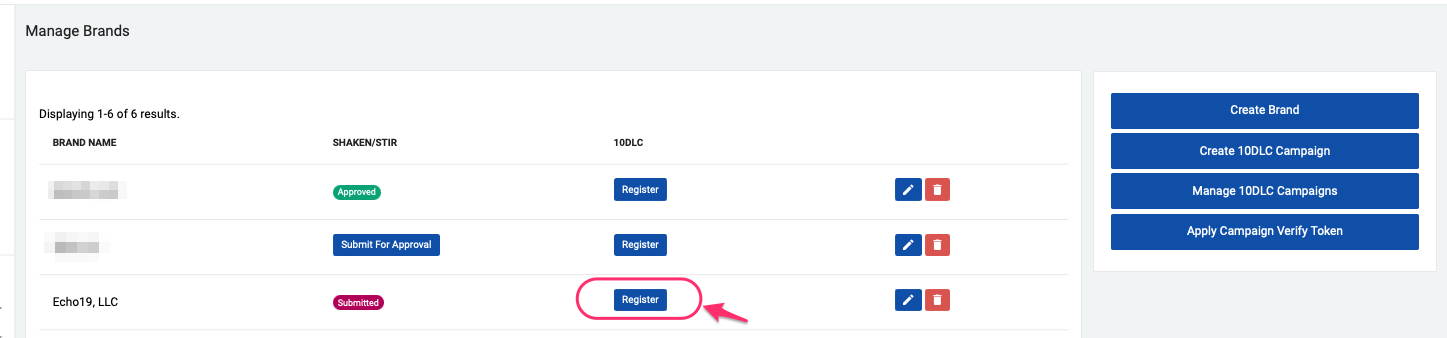
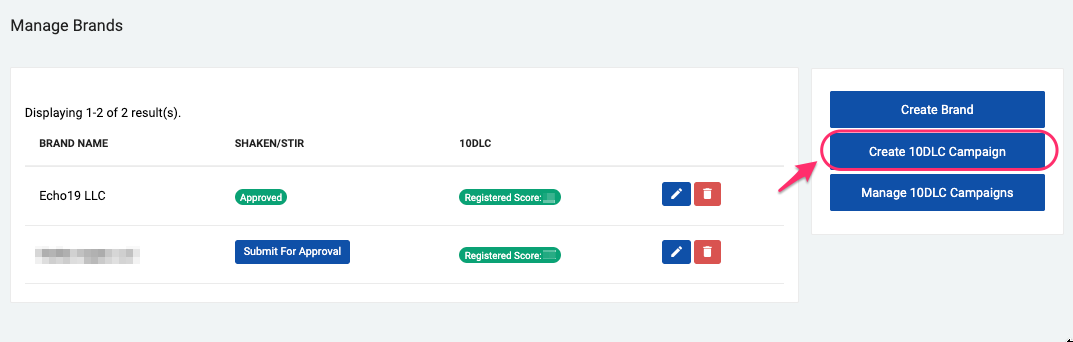
- When you save the form you will be directed to the Manage Brands page. Here you'll see a table with all the brands you have created. The registration status is shown under the SHAKEN/STIR and 10DLC columns respectively.
Here is a list of the different 10DLC brand registration statuses:
| 10DLC Status | Description |
|---|---|
| Missing Required Info | The form is incomplete. It can't be submitted for approval until all the information required is entered. Click the 'pencil' button to edit as needed. |
| Register | The form is completed and ready to be submitted to The Campaign Registry for vetting. Click this button to submit the form. |
| Pending | The brand was submitted and vetting was ordered but no response was received yet. |
| Registered score # | The brand was reviewed and approved by The Campaign Registry staff and is ready for use in identifying your Campaigns. The status shows the TCR score the brand received. |
Once you are ready to submit the form to The Campaign Registry for approval, click the 'Register' button.
This will take you to the Register Brand page, where you will see a summary of the information provided. Please take a moment to review the information entered. If everything is correct proceed to the next steps.
(Optional) If this organization is a political organization that obtained a Campaign Verify token for this SMS vendor, then select the option to 'Use Campaign Verify Token to Import Brand Verification and Score' and paste the token in the required field.
If you don't have the Campaign Verify token yet, but still want to register the brand, you can skip this step and add the Campaign Verify token later by following this procedure: Apply a Campaign Verify Token

What types of political campaigns or committees can request verification by Campaign Verify?
Any candidate, party, PAC, or other committee that is a 527 tax-exempt organization or a sole proprietor and registered with the Federal Elections Commission (FEC) or a State, Local, or Tribal Election Authority is eligible to obtain verification through Campaign Verify.
501(c)(3) organizations, 501(c)(4) organizations, businesses, and other non-campaign entity types are not eligible for verification through Campaign Verify.

- Finally, select the Client to which the brand registration costs should be assigned to and click the 'Submit' button.
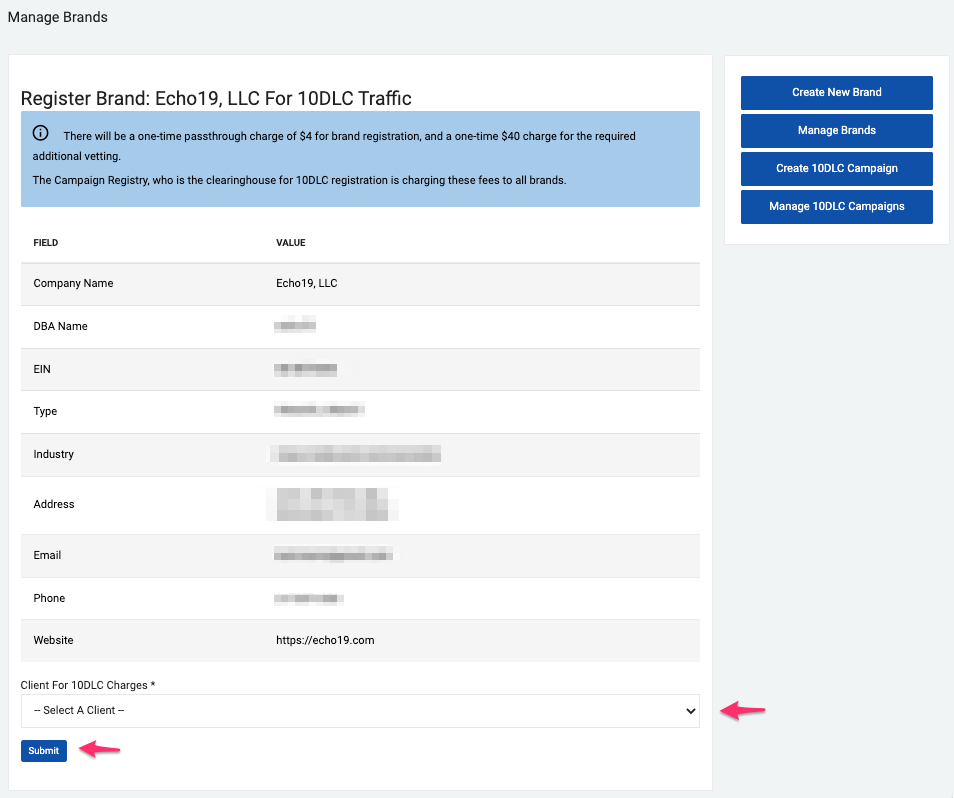

Note
Once a Brand is submitted for registration it cannot be edited. If you need to change any of the information provided, you will need to create a new brand and a new registration fee will be charged.
At this point, the brand registration was submitted and vetting was ordered. This process could take minutes, but could take much longer. Once the vetting process is done, the system will send you an email with your TCR score and a link to start registering campaigns for your brand.
How to Register a Campaign
Access campaign creation page from the Dashboard by selecting the Brands/Campaigns link located in the left menu under the SETUP/ADMINISTRATION section, or by following the link provided in the Brand Registration approval email.
Once on the 10DLC Campaigns page, use the brand drop-down menu to select the approved brand you will use for your campaign. Next, use the usecase drop-down menu to select the use case that best fits your messaging program.
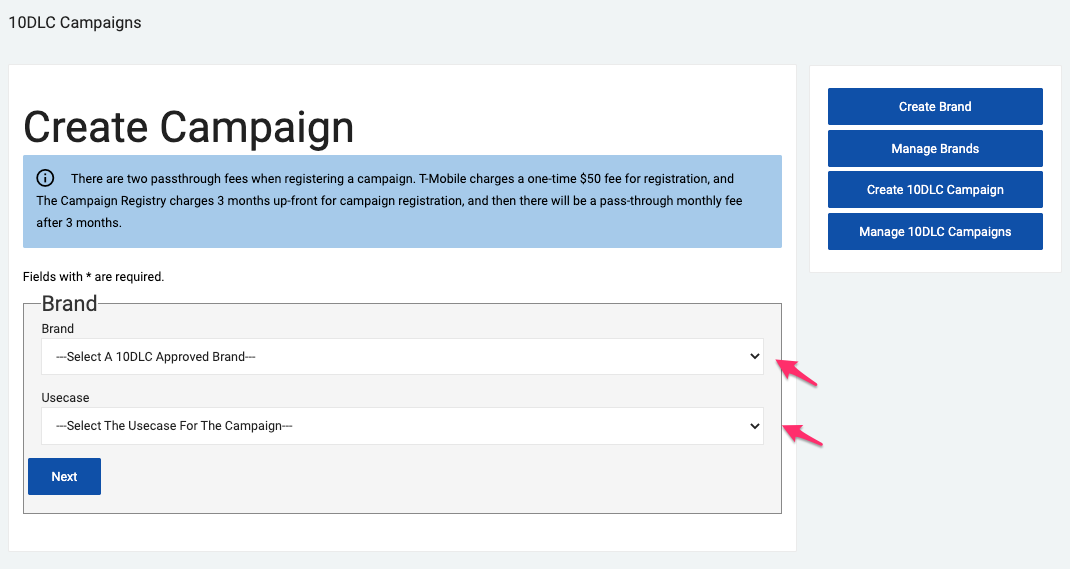


Visit our 10DLC Campaign Types page to find more information about the different use cases and additional guidance on how to register your use cases for nonprofits and governmental organizations.
Depending on the use case selected, the system may offer the possibility to select additional sub-cases for this campaign. However, this is optional.
- Click 'Next' to get more details about your campaign registration, including:
'Brand Vetting Score' and one-time and ongoing fees associated with the use case that was selected.
This page also shows a table with the different attributes for this use case broken down by carrier, including your daily messaging limits and throughput (TPM: text per minute, or Daily Limits for T-Mobile). Use this table to learn if the use case selected will work for the SMS program you are intending to run.

You can scroll up within this page and change the use case to compare the attributes you will get with a different use case.
Depending on the use case selected, the system may offer the possibility to select additional sub-cases for this campaign, However, this is optional.
- Now, go to the Campaign Settings section on this page to complete the additional information required:
- Description of campaign
- How long this campaign should be active
- Messages containing embeded link
- List contains opted-in contacts
- Sample message(s)
The amount of sample messages required depends on the use case that was selected.
- Finally click 'Create' to finish the Campaign setup.
Set Phone Number for Your Campaign
This step refers to establishing the phone numbers a campaign will use as Caller Ids for all SMS programs of this campaign.
Following campaign creation, the system will take you to the Manage Campaigns page. You can also access this from the Dashboard by selecting Brands/Campaigns.
On this page you will see a table with all the campaigns you have created
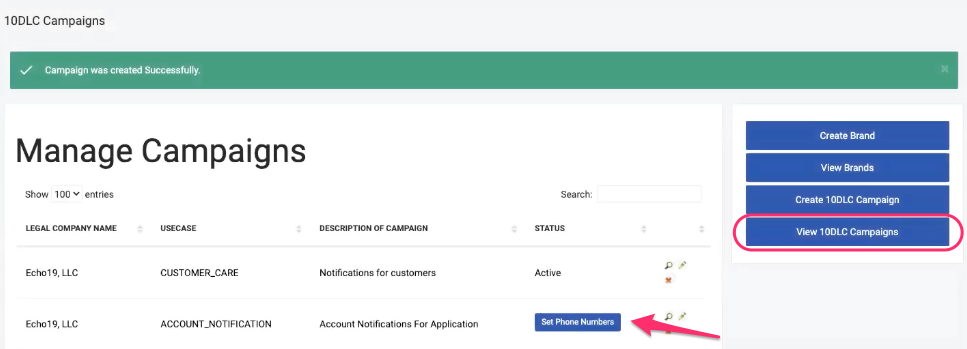
Click the 'Set Phone Numbers' button to start adding numbers to your campaign.
Select the desired area code and click 'Submit'. This process may take a couple of minutes.
Once the numbers are provisioned, the system will take you back to the Manage Campaigns page and you will see that the campaign is now Active. This means you can associate an SMS program to this campaign.

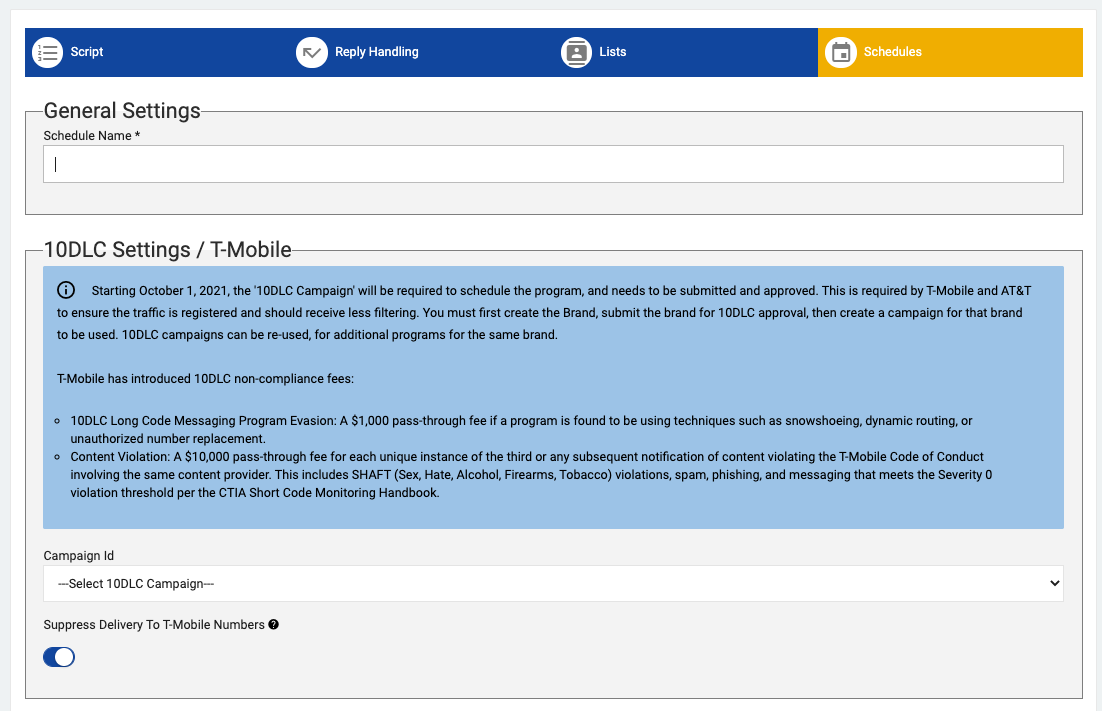
Assigning a Campaign to a Program Schedule
Starting on October 01, 2021, all SMS programs created in echo19 will be required to be linked to a campaign.
Campaigns can be reused for additional programs within the same brand.
Follow these steps to assign your 10DLC campaign to your SMS program schedules:
- In the Schedules section of the program setup, you will notice a new section for SMS programs called 10DLC Settings/T-Mobile. Use the Campaign dropdown menu to select the campaign you wish to use for this program. Only Active Campaigns for this client will be shown as an option in the drop down menu.

Please contact us at support@echo19.com if you have any questions.
