echo MMS HD Video
- 27 Feb 2023
- 6 Minutes to read
- Contributors


- Print
- DarkLight
- PDF
echo MMS HD Video
- Updated on 27 Feb 2023
- 6 Minutes to read
- Contributors
- Print
- DarkLight
- PDF
Article summary
Did you find this summary helpful?
Thank you for your feedback!
Introduction
This user guide will assist in the set up of HD Video Multimedia Messaging Service (MMS) programs. If you don’t see what you need in this document, please reach out to support@echo19.com, and we’ll provide any assistance you need to successfully launch and administer your MMS programs.
Step 1: Create Outbound Program
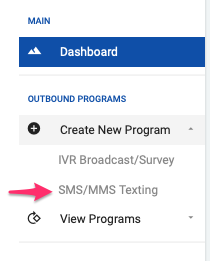
From the echo19 Dashboard, select Create a New Program from the Outbound Programs section on the left side menu. Then select SMS/MMS Texting.
Name the program and assign it to a client in the Client ID drop-down menu and then click Create Program. “Clients” can be used to keep campaigns separate and organized.

Step 2: Define the MMS Program
Once the program is created, the Script tab of the program setup screen will be displayed. Within the Text Program Options section, there is a toggle for Will you be sending a multi-media text message (MMS message)? Activate this toggle, and a file uploader function will be displayed, allowing the addition of the image or video to be included along with the text message.

Step 3: Send HD/High Quality Video
Activating the Send HD/High Quality Video slider will trigger the system to transcode the video and deliver the highest quality file permissible to each recipient handset.
- Toggle the option to Send HD/High Quality Video
- Use the Choose File button to upload the video. echo19 recommends that users upload the highest quality video file that they have for optimal viewing results.
- Click on Upload File. The system will automatically transcode the file for the best possible resolution on each carrier network. This process can take a few minutes. Once the files are processed, they can be previewed with Safari and Edge on a computer, or Safari and Chrome on an IOS device. They can also be delivered for preview on a phone or multiple phones (separated by comma) using the Preview button.

Video Duration
We support transcoding videos up to 1-minute long. However, for best results we recommend using videos up to 30-seconds long
Step 4: Create a Message
Type the text of the message in the Messages text field. Use the Inject Element From List button to insert data from one of the uploaded recipient lists phone list, such as the recipient’s first name.

There are five pre-built fields ({firstName}, {lastName}, {age}, {sex}, and {race}), and ten generic ones, available to be matched with any of the fields from a data list (the process of field matching is explained here Uploading, Field Matching, and Understanding Your Phone Lists
To save the message, click Add Message. Multiple messages can be added to each program to allow message rotation or to test different messages throughout the program. Confirmation that the message contains appropriate opt-out instructions will be required. Repeat these steps to add additional messages.
Once the message is created, it appears in a table below the Messages field, along with a Retire and a Preview button.

The system will use messages in order, from top to bottom. Messages that are no longer providing higher delivery, or are no longer desired in the rotation can be retired. Once a message is retired, the system will proceed to use the next available message.
Click Preview to review the message. In the Preview window, enter the phone number (or numbers, comma separated) and click the Send To Phone button.
Step 5: Uploading, Field Matching, and Understanding Phone Lists
To add phone lists, click on the Lists button at the program navigation bar.

Upload a file and then match the appropriate data fields from the list with the corresponding echo19 program fields. Matched fields will be carried over in the results file after the program is completed. The only required field is phoneNumber. All other fields can be used to insert data into program messages.

Step 6: Scheduling a Program

The last step is to set up a schedule for the program. First, create a name for this schedule. Since a program can have more than one schedule, having a name for the schedule is helpful for differentiation.
Choosing Date and Time
The next step is to select the date and time period the program will run. It is possible to schedule programs to run within the same time windows over multiple days.
Select the recipient phone list to use for the schedule. Multiple phone lists can be selected, for example, a target list and a suppression list. If multiple target lists are selected, the system will dedupe numbers between them.

Click on Submit when all parameters are set.
Multiple schedules of the same program can be created - just repeat these steps for any additional schedules and lists. Programs with multiple schedules offer the ability to visualize and export results for all schedules combined or for each individual schedule.
Once the schedule is submitted, it will appear listed on a table at the Schedules page. Each schedule will have a series of possible Actions:

Settings
- Review Settings: check the schedule settings
- Modify: use this button to modify any of the schedule settings
- Delete: use this button to delete the schedule
- Invalidate Previous Links/Sessions: use this button to invalidate and create new links for Send and Respond To texts (see below)
Reports
- Results
- Live Agent Monitor: visualize activity of sending agents
- Monitor agent responses and review conversation threads
- View agent productivity
- End a specific particular volunteer/agent session
- Block rogue agents
- Review flagged messages
- Analyze Delivery: use this visualization tool to track the delivery rate trend of the program. It shows the delivery rate per domain, per message, and by carrier
Run
- Send Texts: use this button to gain access to the message transmission interface. The system generates the URL to be distributed to the volunteer/agents tasked with sending the messages. The landing page is a sign-in page where volunteers/agents will login to start texting (no password is required). The personal information requested is used only to track the volume of messages each volunteer/agent sends. Anyone with this link will be able to send texts, even without an echo19 account
- Respond To Texts: use this button to gain access to the response interface. The system generates the URL to be distributed to those volunteers/agents tasked with responding to any inbound replies received. Anyone with this link will be able to respond to texts, even without an echo19 account
- Bulk Classify Initial Responses: this requires training from echo19, please contact us to schedule a training session
Step 7: Viewing, Understanding, and Using Results
Once message delivery is started, results can be viewed and exported through the Results page.
Please note that there is a checkbox beside each Connection Result. This checkbox allows the creation of a new list with the records associated with the selected disposition. For example, to send a follow-up text message to all the recipients that received an initial message, check the box for Delivered and then click on the Create List From Selection button located at the right hand side menu. The system will generate a new list and add it to the available lists for this client.

The Results page also includes delivery rate information by carrier. This information is helpful especially when monitoring the progress of programs that include individualized links for survey or donor recruitment. When the delivery rate for the most recent 1,000 messages begins to deteriorate, this is likely an indication one or more carriers is filtering the traffic. Message and/or domain rotation are advised.
Please contact us at support@echo19.com if you have any question
