echoIVR user guide - NEW
- 19 Jan 2023
- 14 Minutes to read
- Contributors


- Print
- DarkLight
- PDF
echoIVR user guide - NEW
- Updated on 19 Jan 2023
- 14 Minutes to read
- Contributors
- Print
- DarkLight
- PDF
Article summary
Did you find this summary helpful?
Thank you for your feedback!
Introduction
This guide contains information and guidance for setting up an IVR program, whether a Broadcast Message, a Patch Through call, or a Survey with standard or randomized answer options. The Script Builder tab was recently reworked to allow users to build any IVR program under the same call type: IVR Broadcast/Survey.
Depending on the goal of the program there are multiple options for the setup. This guide sets out the most common use cases, with a suggested way to set up each type. However, the new page is flexible and allows program flow customization to adapt to almost any needs.
The processes for adding recordings to the system, testing the call, uploading target lists, and viewing and exporting call reports are the same for any IVR program. These are explained in steps #4 to #9 below. Specific guides for each of these steps can also be found by visiting these articles:
- Recording IVR Scripts
- Testing an IVR call
- Uploading, Field Matching, and Understanding Phone Lists
- Setting the Call Schedule
- Viewing and Understanding IVR call Results
Finally, this call type also includes the ability to add an in-call opt-out option using any of the Valid Answers. Visit IVR In-call Opt-out to find the steps for creating an in-call opt-out answer option.
If you don’t see what you need here, please reach out to support@echo19.com, and we’ll get you the information you need to successfully launch and administer your program.
Step 1: Create Outbound Program
On the Dashboard, select Create New Program from the Outbound Programs section on the left side menu.

Name the program and assign a client. If you need to set up a new client, enter it during this step and then click Create Program.

Note
When you create a new client, you will have the option to customize the Default HELP Message for Texting Programs. This only applies to texting programs. If you want to learn more about this option please visit this article.
Step 2: Answering Machine setting
Once the program is created, the Script tab of the program setup screen will be displayed. The first setting is to direct how the call will behave if an answering machine is detected. Use the Leave Answering Machine Message dropdown to select if the program should leave an answering machine message or not.

Note
If you choose to leave an Answering Machine message a separate recording will be required
Step 3: Define the Program
A. Broadcast Call
Create an automated dialing program to call landlines and play a prerecorded message when a human answers the phone, or when an answering machine is detected (optional). With this simple but powerful tool you can communicate with your audience in minutes.
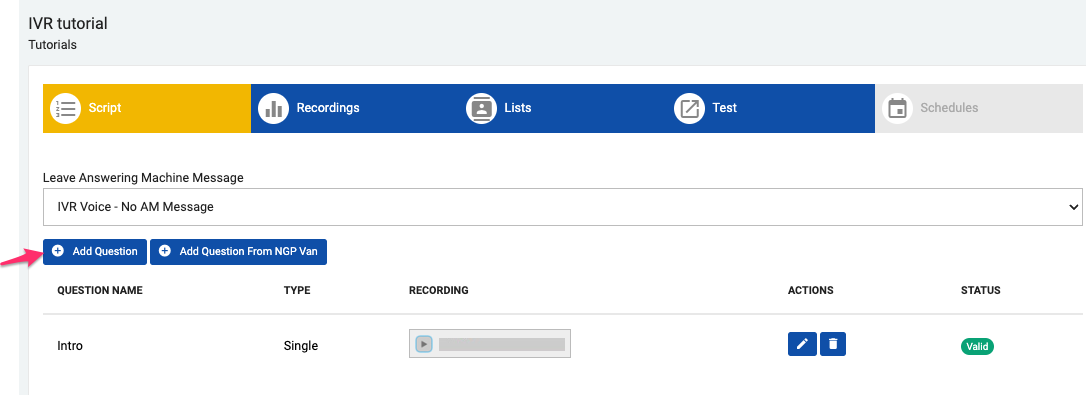
To set up a Broadcast call use the Intro question. You can review and edit this question's settings by clicking on the Edit button located to the right of the question under Actions.

After you click on Edit, the question's settings will be shown in an editable form.

Please note that the Proceed Immediately box is checked by default. This makes the system automatically play the next question without waiting to receive an answer from the call recipient. This basically turns the question into a statement that does not require a response.
For this use case, the next question by default is always the End Message.
This is how the flowchart for this program would look like:

Note: If you would like to allow call recipients to opt-out from receiving future calls from this organization, please follow the steps explained here IVR in-call opt-out.
B. Patch Through Call
Create an automated dialing program to call landlines asking call recipients to be patched through to another line. This IVR call option is commonly used for programs looking to recruit individuals to contact their legislative representatives to support/oppose certain issues or bills.
A Patch Through program can be set up just by editing the Intro question using these steps:
- Edit the Intro question and uncheck the **Proceed Immediately **box.
- Select a Valid Answer for the patch. For example, the script will instruct the call recipient to press 1 to be patched. Check box 1 and type a label for this action.
- Use this Valid Answer Default Action dropdown menu to select Call Transfer. This will open a new field to insert the destination number (number to patch to).
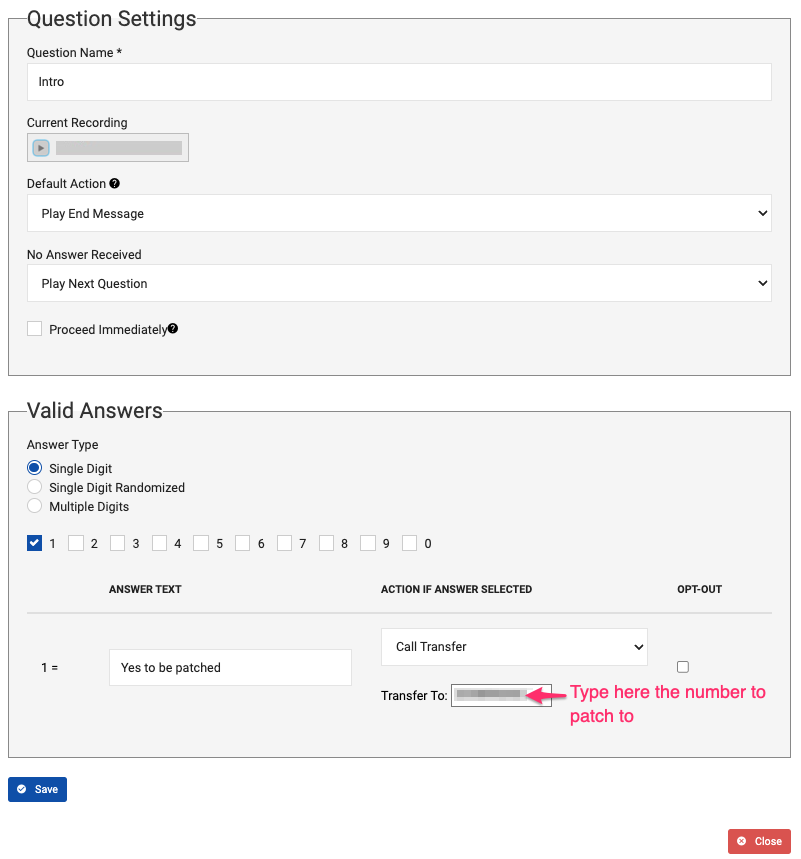
- Save.

C. Survey Call
Collect data by calling contacts to their landline. Experience enhanced IVRs with our simple, user-friendly, call logic building with skips, multi-digit validated responses, and randomized answers. Tailor your survey with call completion thresholds based on disposition or survey response. Manage multiple schedules, with one result data set and the ability to clone calls, creating multiple result data sets.
Adding Questions to the Survey
Click the Add Question button from the Script page.
A menu will be displayed where you can build out your program’s questions: Question Name, behavior of the call after the question receives a response(Default Action) or when no answer is received, response type, etc. The Proceed Immediately checkbox allows you to create a statement inside your survey, such as a transition phrase. For example, “Thanks for your answer, next…” When this checkbox is active, the system will play the recording and immediately move on to the next question without waiting for an answer. As you start building the survey, you will be able to use the Default Action setting to add logic or branching to the survey.


- Valid Answers Option 1: Single Digit
To create a question with non-randomized responses, select Single Digit and the appropriate number of answer choices you want to provide to the recipient. Type your responses and assign their Default Action. The Answer Text you choose here will carry over into the results file.
The recording for this question must include the digit pressing instructions.
For the example shown below, the question could read: “Regardless of the way you are registered, do you consider yourself a Democrat, a Republican, or an Independent voter? Press 1 if you consider yourself a Democrat, press 2 if you consider yourself a Republican, or press 3 if you consider yourself an Independent voter.”

- Valid Answers Option 2: Single Digit Randomized
To create a question with randomized responses, select Single Digit Randomized and the appropriate number of answer choices you want to provide to the recipient. In the example below, the question asks “What is your favorite ice cream?” The order of the responses for “Chocolate” and “Vanilla” will be played randomly. Also, if you do NOT want to randomize a particular response, you can click the appropriate checkbox under Do Not Randomize as shown for “Undecided” below (which will always be played as the third option, Press 3.)

When you select Single Digit Randomized, you will need separate audio files for each answer choice and each of the digit pressing prompts. Even if one of the valid answers won’t be randomized, you’ll still need two separate audio files for that one too. In our example, we would have needed 6 audio files:
- Audio file 1: “Vanilla”
- Audio file 2: “Chocolate”
- Audio file 3: “If you are undecided”
- Audio file 4: “Press one for”
- Audio file 5: “Press two for”
- Audio file 6: “Press three”
You will also need to record the question separately:
- Audio file 7: “What is your favorite ice cream?”
All these audio files will be uploaded in the Recordings tab.
- Valid Answers Option 3: Multiple Digits
If you want to program a question that can receive multiple digits from the call recipient, select Multiple Digits for Answer Type. An example of this type of question is: “For statistical purposes only, please enter your 4 digit year of birth.” Here, you’ll also have the option to **select **Lower Limit and Upper Limit.

Step 4: Using the Program Flowchart
Once your question(s) are programmed, you can Edit past questions to refer them to other questions, as necessary, creating customized branching. Additionally, as questions are added and settings are edited, the Program Flowchart is automatically updated to help you visualize how the survey is programmed. In the example below, the flowchart shows a question about favorite ice cream flavor leading either to a question about volunteering at the ice cream parlor or to the end of the call. For the purposes of this survey, we only want people who prefer chocolate to work at our ice cream parlor. If “vanilla” or “fruit” is selected, then the End Message will be played and the call will end.

Step 5: Recording IVR Scripts
Click the Recordings tab on the program navigation bar to go to the Recordings page. Here you’ll see the different recordings required for the program.
If the program is a survey, you will notice that, apart from the individual questions of your survey, there are three required recordings: The Live Voice Message (or intro to the survey), the message to be played when there is an invalid digit pressed, and the End Message.
For surveys with randomized answer options, the recording requirement is slightly different as the prompts for digit pressing (Press 1 for…, Press 2 for…, etc) are recorded separately from the answer options.
The Recordings page offers two options to get audio into the system: either attach an existing audio file or record new audio files.

Option A
Upload an existing .mp3 or .wav audio file from your computer by choosing the 'Choose File' button for each of the messages. Once the sound file is uploaded, a sound player will appear where you can review the message.
Option B
Record your script via phone by calling into the system. Check the boxes of the messages you want to record, then click on Create Recording Instructions For Checked Items. You can select all the items by checking the 'Select All' box.
This will generate a set of instructions and a unique PIN number so you can call in to record your message (calling from landlines provides the best quality audio). To send these instructions by email to the person who will record the audio, click Send Instructions. Once the recording is done, refresh the page. You should now see a sound player that lets you preview the recorded message(s).
Step 6: Testing the Call

Once you have all the recordings needed for your script, you can test your call. To do this, click on the Test tab on the program navigation bar. (Note: This tab will not be available until recordings are uploaded.) Enter the phone number where you want to receive the call. The system provides a default number that will be used for Caller ID. You can edit this number if needed.

Caller Id
The caller ID used for test calls is not the caller ID your program will have. You will be able to select a caller ID when creating a schedule for the program.
Step 7: Uploading, Field Matching, and Understanding Phone Lists
To add phone lists, go to the Lists tab on the program navigation bar.

Click Add List. At the pop-up menu, provide a name for the list or leave this field blank to adopt the uploaded filename. You’ll also have the option to define your list as:
a) Target List: the list of phone numbers that will be dialed to deliver your message.
b) Suppression List: a list of phone numbers that will NOT be dialed if selected.
c) Global Suppression List: phone numbers on this list will be automatically scrubbed out from any programs run by this user (regardless the Client). Global suppression lists won’t have to be selected when creating the Schedule, the system will automatically remove the numbers contained on this list from all future schedules.
d) Client Automatic Suppression List: similar to Global Suppression lists, but only apply to the specific Client this program was created for.
Next, choose your file and upload your list by clicking Create a List. The system accepts .csv, .txt, .xls, and .xlsx file types.
Once you upload the file, the next step is matching the appropriate data fields from your list to the echo19 system. This is important to make sure your list is read correctly. The fields you match will be carried over to the results file after the call program completes. You can match as many columns as you want, but make sure that there is a column set to phoneNumber, as this is the data that will be used to dial. This is the only column required to place the calls.

Once the system has processed your list, you’ll see a count of unique phone numbers in your list. You also have the option to split the list Randomly, by Timezone, or by a field in the phone list. For this, click on the Split action button.

Step 8: Setting the Call Schedule
Go to the Schedules tab on the progress navigation bar to set the parameters for your call schedule, such as date and time, phone list to be used, and caller ID.

A program can have multiple schedules, allowing you to dial the same program over different nights, for example. Each schedule will have its own list(s) and results reports. However, the system allows you to create and visualize combined results reports with data collected from all schedules within a program.
During this step you will also be assigning a SHAKEN/STIR brand to the program. Brands are used to identify the organization making the calls. Click here to access our step-by-step guide for creating Brands in echo19. This is a legal requirement. All automated calls must have a registered and approved Brand associated with it to be allowed to run through echo19.
Important!
Please note that the system does not automatically deduplicate records that may exist among the lists used for the different schedules within a program.
Dial Settings

There are a number of settings that you will need to define as you program the schedule:
- SHAKEN/STIR Brand profile: select the Brand to be used to identify this program.
- Caller ID: Use the system’s phone number provisioning feature to** Acquire a New Number**. You will have the option to choose an area code for local numbers, or a Toll free number that contains certain digits. It is possible to bring your own caller ID, but the number needs to be activated (attested for SHAKEN/STIR) through our vendor's system. This process has a set up fee and requires coordination with the involved parties.

Dial Rate Type: Use Full Scheduled Time or Live Connects Per Hour.
Redials: Redial up to two times during the same schedule and choose which scenarios require a redial.
Select the list(s) that you uploaded that you want to dial. You can select more than one list and the system will delete duplicate numbers, if any. If you uploaded a Suppression List and you want to scrub those numbers out, you should select it during this step.
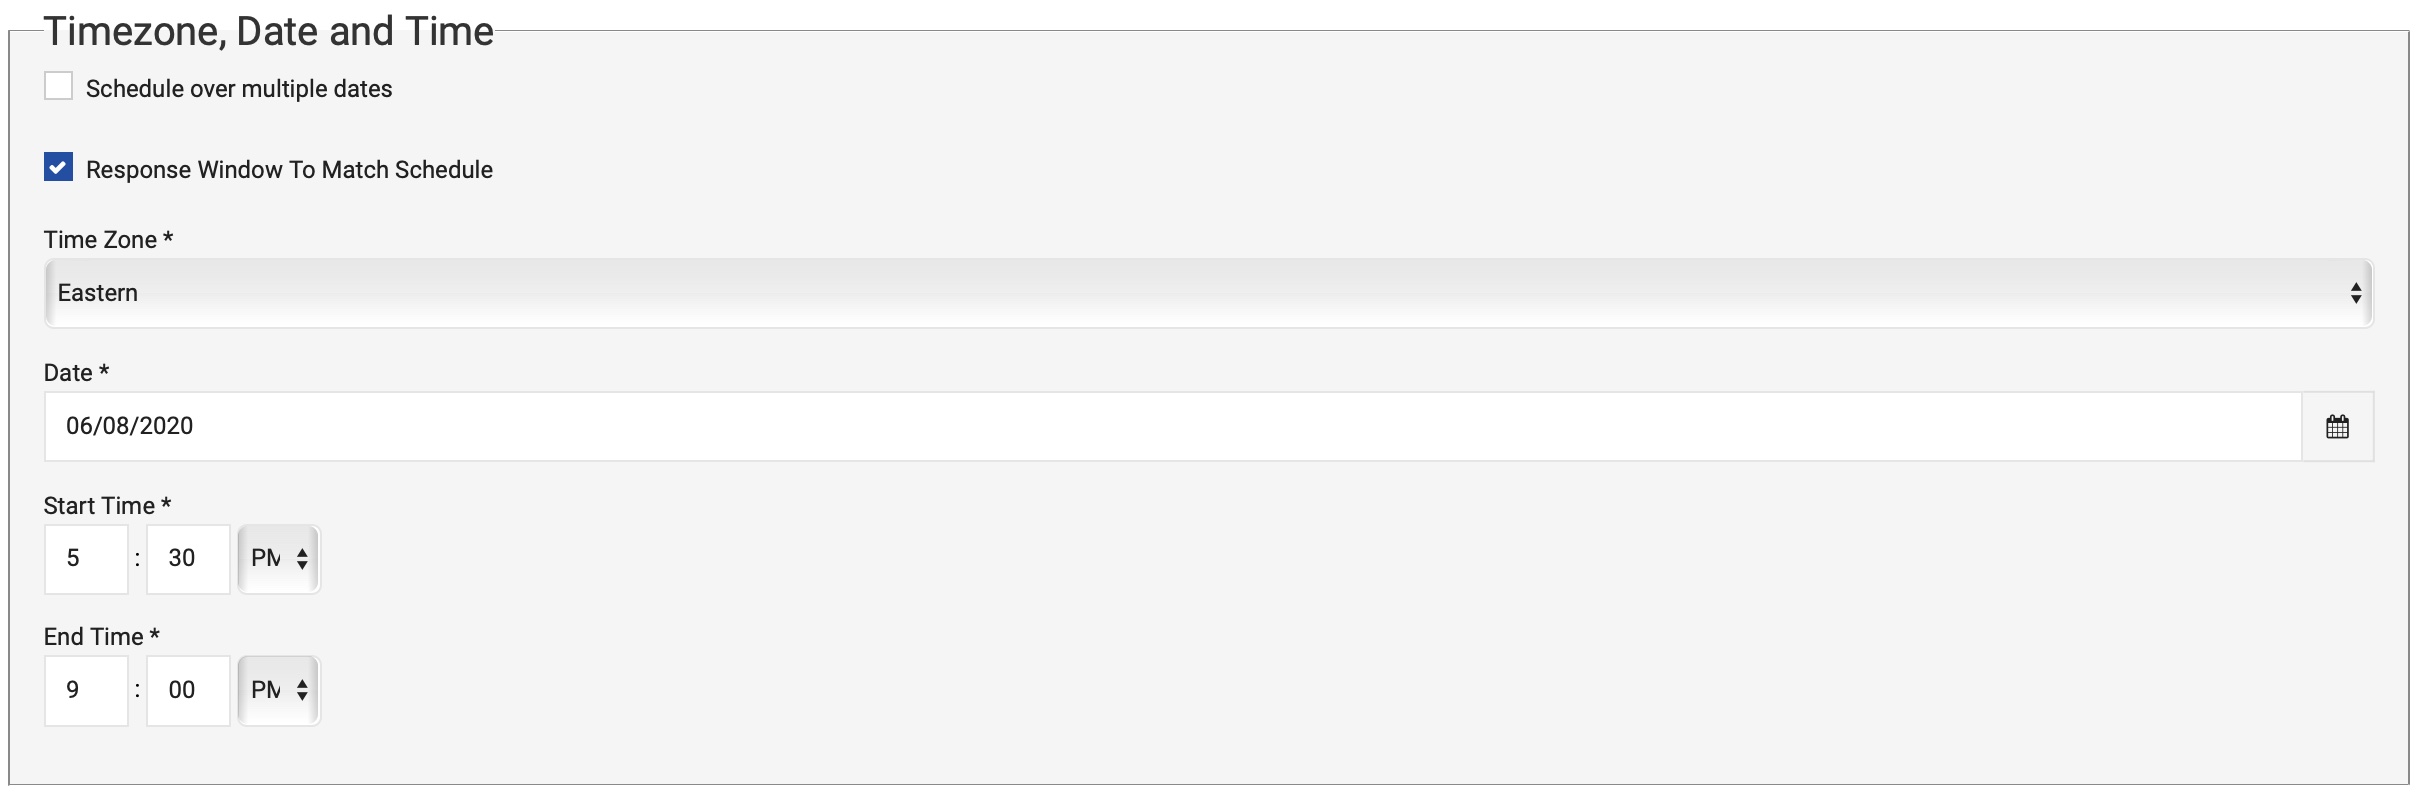
Select the Time Zone, Date, Start Time, and End Time.
You have the option to set specific thresholds that will stop dialing once a certain number of live connections or answering machine detections (or both) are made, or when a certain number of answers to a question have been received.
Save your settings by clicking on Create Schedule. Your call will be scheduled to launch at the date and time you chose.

Note
Once a schedule has been created, the call settings can’t be changed (recordings, call behavior, questions, etc). If you need to change any of these settings you’ll have to delete the schedule and create a new one once you’ve made your changes.
Once the schedule is submitted, it will appear listed on a table at the Schedules page. Each schedule will have a series of available Actions:

Schedule Settings
- Review Settings. Check the schedule settings.
- Modify. Use this button to modify any of the schedule settings.
- Delete. Use this button to delete the schedule.
Program Settings
- Script
- Clone Program
Reports
- Results
You can access all your upcoming schedules from the Dashboard by clicking on View Programs on the left side menu and selecting Upcoming Schedules.
Step 9: Viewing and Understanding Call Results
Once a call schedule completes, you can view and export results by selecting Results from the Completed button on the Dashboard.
Note
Partial results can also be viewed and downloaded by accessing the program Results page while it is running. For this find the appropriate program under Running schedules

You can also access your programs through the left hand side menu, under the Outbound Program section. Click on View Programs and select the status of the program you are looking for, in this case Completed schedules.

From there, you can view an overview of the call dispositions and a count of the answers received for each question. Use the buttons on the right to export the data file by selecting Export Results to CSV or Download PDF reports.
Please note that there is a checkbox besides each connection result. These checkboxes allow you to generate new lists using the call results and generate hybrid calling lists. For example, if you wish to send a follow-up call to all the people who answered the phone, you could check the box for Live Person and then click on the Create List From Selection button located at the right hand side menu. The system will automatically create a new list with those records. This new list will be added to the available lists for this client and you will be able to create a new program to contact this specific group.
Please contact us at support@echo19.com if you have any questions.
