echo SMS/MMS
- 01 Nov 2023
- 16 Minutes to read
- Contributors


- Print
- DarkLight
- PDF
echo SMS/MMS
- Updated on 01 Nov 2023
- 16 Minutes to read
- Contributors
- Print
- DarkLight
- PDF
Article summary
Did you find this summary helpful?
Thank you for your feedback!
Introduction
echoSMS is a large scale, distributed peer-to-peer texting application that empowers communication and research projects by harnessing the power of volunteer or paid agents. No matter the scope of your program, echoSMS is a robust and efficient part of the echo19 suite of communications and research tools.
This user guide will help to set up a new peer-to-peer SMS program, including features to ensure a high delivery and participation rate. If you don’t see what you need here, please reach out to support@echo19.com, and we’ll get you the information you need to successfully launch and administer your echoSMS program.
Step 1: Create Outbound Program
On the Dashboard, select Create a New Program from the Outbound Programs section on the left side menu. Then select SMS/MMS Texting

- Name the program and assign a client. “Clients” can be used to keep campaigns separate and organized. Some organizations use this as “projects.” If you need to set up a new client, enter it during this step and then click Create Program.

Step 2: Define the Script
Text Program Options. Select the option(s) that best describe the texting program you would like to setup. Each option will activate specific features for each program type.

Option #1: Will you be running an interactive program and utilizing our survey builder?
This will direct you to a screen that allows you to build your survey by adding questions and responses. See below for details.
Option #2: Will any of your messages contain a link?
Strategy for sending messages: Select ‘Use One Domain, and One Message Until They Get Retired’ (Recommended)
Domain field is presented below Messages field. This is where you will add a domain to your program for either redirect a unique long URL or for shortening individualized links contained on your phone list.
Option #3: Will you be sending a multi-media text message (MMS)?
A file uploader section will be shown to allow you to add the image or video you would like to send along with your text message.
Option #4: Are you running a simple texting program and don’t need the above features?
Proceed to the Messages section below. After creating/writing your program, go to Step 3: Reply Handling.
Combining options
Options #1 and #3 can be used in combination with option #2 Will your messages contain a link? Mainly used for for shortening a long url and for sending individualized links. Please feel free to reach out to echo19 at support@echo19.com if you have any questions
Messages
Type the message in the Messages text field. Use the 'Inject Element From List' button to inject data from your phone list.

There are five pre-built fields ({firstName}, {lastName}, {age}, {sex}, and {race}) and ten generic ones available to be matched with any of the fields from your data (the process of field matching is explained on Step 4). Additionally you will see a tag for {domain} and {shortenedUrlCode}. These are the tags you will use to build the link you plan to send through your SMS program — it will be further explained in Option #2.
As you type your message, a character count and segment count are calculated automatically. The character count includes letters, numbers, spaces, and punctuation, and accounts for the number of characters in each injected element. Your message is billed by segments. Each segment is 160 characters, or 67 characters long if there are special characters. Special characters, such as an “ó”, affect the way the message is encoded making segments shorter (67 characters).

To save the message click Add Message. You can add multiple messages to each program to allow message rotation or to test different messages throughout the program. If you have not already done so, you will be prompted to check the box confirming your message has appropriate opt-out instructions. Repeat these steps to add additional messages. Once the message is created, it appears on a table below the Messages field. There, you’ll see a Retire and a Preview button next to the message. Click Retire to tell the system not to use this message. This action is equivalent to deleting the the message. Click Preview to review your message. In the preview window, enter the phone number you would like to use to send a test message. When ready, click Send To Phone.

Option #1: Interactive Program or In-Line Survey Builder

An Interactive Program is used to have a scripted conversation with the text recipient or to run an in-thread survey, which is a survey that is delivered entirely through text messages. When this option is selected you’ll be directed to a screen to build your survey rather than a screen to add individual messages. Here you can add questions to your script, which will appear in-line, as the exchange takes place between the recipient and the agent/volunteer who is driving the conversation or the survey. To add your first question cleick on Add Question

First, type a Question Name, such as “Introduction,” “Voter ID,” or “Presidential vote?”. Under Full Question for Script, type your question exactly how you’d like it to appear. Your first question will likely ask the recipient if they are willing to participate, and must include appropriate opt-out language.
For each question, you can define the valid Answers expected. You can also assign an Action to each response, which will add logic to the survey/conversation. You can either send the recipient to the next question or end the survey. As you build the survey, the different questions are added to the Action field as options to chose from. With each of these, you can add and edit a Response Text, if you’d like. For example, if you choose “Q1: Did you vote in the 2020 election?”, the response ‘No’ ends the conversation. You could then add a Response Text response to that answer that says “Thank you for your time, have a great day”. This way, when the responder marks ‘No’ as the answer received, the system will pre-populate the next text to be sent with that message.
There are ten fields for valid answers plus some additional pre-written options: Other, Unsure, Refused, Terminate. You can use any and all of those to include all the possible responses you are expecting. Use Freeform to direct the system to copy the text from the reply received exactly as it was written, such as when the respondent enters a year. This way the responder (agent or volunteer) will not have to retype the answer received, minimizing human error.
As you build your survey, a Program Flowchart will populate so you can visualize your survey easily.

All responses received and marked by the responder will be stored and deliver to you in the Results report. These can also be viewed (live as they come in) at the Result’s page for the program.
Option #2: Will any of your messages contain a link?
When this option is selected, a Domains section will be displayed below the Messages field. This section is used to add domain(s) to your program.

There are different use cases:
a) You have the link you want to include in the message. Simply type in the link into the message field or use the {domain} tag in the message and add the domain in the Domain field. Though domains can be written as either, for example, https://panel19.com/ or panel19.com, we would recommend using the latter to save additional characters.
b) You want to shorten a long url. To shorten long URLs using echo19 shortener, you must acquire a domain through echo19 and make it redirect to your long URL. Select Texting Domains from the Setup/Administration section at the bottom of the left side menu. Refer to the Acquiring Domains guide for the steps to acquire domains in echo19. Once you have acquired the domain in echo19, you will add a {domain} tag in the message and then apply the purchased domains to the program by clicking on the ‘Add Domain(s) Provisioned in Echo19’ button.
c) You want to text individualized links (each record on your phone list has an individual URL). For this inject the {domain}/{shortenedUrlCode} variable into the message. The system will read the variable {domain} from the Domains’ section. You must acquire a domain through echo19 and apply it to the Domain section. The variable {shortenedUrlCode} will be read from your phone list. To use this variable, the phone list file must contain a column with the long URL you want to shorten. At the time of uploading the list, this column should be matched with the appropriate field. More details on how to match fields when uploading the list are explained on on Step 4. This is an example of what your link will look like on the recipient’s phone: domain.com/RF4Gm
Adding multiple domains to your program allows domain rotation. As a general rule, we recommend having at least one domain per one thousand records on your phone list. Please contact echo19’s staff as this recommendation may vary depending on the type of program you are running.
Option #3: Sending MMS Messages
Use this option if you wish to send a video or an image with your text. Use the 'Choose File' button to upload the media file. Please note each phone carrier has different size limits, and they will compress the file to the size limit allowed through their network. Please note that MMS messages have a different price per message that includes a 2,000 character-long message plus one image or video.
Step 3: Reply Handling
Under the Reply Handling tab in the program navigation bar, echoSMS allows you to customize how your program handles incoming messages.

Tags
Tags are used to label a record based on a person’s reply to your message. Tags can be assigned to each record in the ‘Respond to Texts’ interface or can be automatically applied when using Response Action (to be explained later in this section).
Commonly used tags are:
- Wrong Number
- Follow up
- Opt-out (system default)
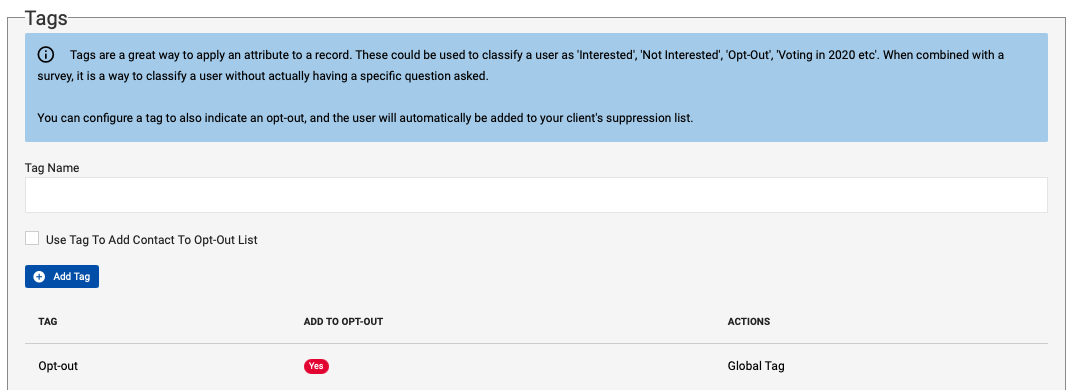

The system has an Opt-out default tag and is meant to be used when the recipient of your message asks to be removed from future programs. Records tagged with ‘Opt-out’ are added to a suppression list for this client. Numbers included on the suppression list will be removed from any future programs run by this client.
There is a report option on the Results page called ‘Download Coded Report’ that will include applied tags in the requested data report.
Canned Responses
Create pre-written responses to quickly respond to text replies. Be sure to keep each phrase on its own line. Inject as needed any additional data from your phone list (i.e {firstName}, {extra1}, extra2}, etc). Additional canned responses can be added at any point, even after the program is running, and there is no limit in the amount of canned responses you can create. These canned responses are listed on the Respond To Texts user interface for easy access. Responders only need to click on them to add them to the text field of their response. See an example below.

Response Actions
This feature was designed to make responding and tagging messages more efficient. It allows the user to set automatic actions triggered by the content of the incoming messages received. Create a Response Action to:
automatically apply tags when certain conditions are met;
add a recipient to the opt-out list;
mark a reply as not needing a response and eliminate it from the list of messages needing a response, and/or;
immediately create a response message to send to the recipient through the ‘Send Texts’ flow.
Creating a Response Action is easy. Here are the required parameters:
Title: use this to assign a name to the response action.
Phrases: type the specific phrases that, if they appear in the reply, will fall under the Response Action you are creating. Keep each phrase on its own line.
Queue Reply To Recipient: use this to select whether the action uses one of the Canned Responses or select ‘Do Not Send a Response’ if no response is required. If a Canned Response is chosen, an outbound message is created and sent through the delivery flow (‘Send Texts’ flow).
Apply tags: select which tags apply to this rule.
Example:
Opt-out Response Action: the system screens the replies it receives for words or phrases that indicate the message recipient wishes to be removed from future texting programs. Then it will tag those records with the opt-out tag and automatically add them to the client-specific suppression list. It will also mark these replies as ‘No Response Required,’ eliminating them from the list of pending messages needing a response.

Step 4: Uploading, Field Matching, and Understanding Your Phone Lists
To add phone lists, click on the Lists button at the program navigation bar.

Upload the file you want to use and then match the appropriate data fields from your list with the text drop-in elements you want to use. The fields you match will be carried over in the results file after the program is completed. You can match as many columns as you want but make sure there is a column set to phoneNumber, as well as a column for each injected element in either the text of the message or the Canned Responses. (i.e. {firstName}, {extra1}, etc).

Shortening Links in echo19
If your program requires dissemination of individualized links, you would use this step to tell the system which column on your list contains the long URLs it needs to shorten. The system will create a 5-digit unique code for each long URL on your list. These shortened codes only work in combination with domains that are set up to point at echo19’s IP address. Domains acquired through echo19 will automatically register the appropriate DNS settings. If you would like to use a domain acquired by your organization please email us at support@echo19.com to get instructions for proper DNS setup.
Link referral tracking and reporting is available when using echo19’s shorten links.
Step 5: Scheduling the Program

The last step is to set up a schedule for your program. First create a name for this schedule. Since a program can have more than one schedule, having a name for your schedule is helpful to differentiate the schedules.
EchoSMS offers some advanced settings that you can customize to improve message deliverability. Each setting is defaulted with echo19’s general recommended values. Please contact echo19 team before changing any of these values. Here is a brief description of each one:
Caller ID Settings
Echo will provision Caller IDs based on the numbers in your lists, and will release and provision additional caller IDs as necessary to improve message delivery. Choose this setting if you wish to:
- Customize the amount of phone numbers for caller IDs you would like the system to acquire on your behalf.
- Change the error codes you want the system to consider as violations when analyzing carrier filtering.
- Assign number of violations to be accepted before a caller ID is retired.
Domain / Message Rotation Settings
If you wish to use the automatic Domain/Message Management feature select ‘Auto-Retire Domains and Messages’. Set the Auto-Retire percentage to the lowest Delivery Rate you want the system to accept before rotating the message and domain in use. Once the delivery rate drops below this value, the system will rotate to the next available message and domain available. Please note that when this feature is selected, if the system runs out of domains and messages to rotate, the program will automatically stop to avoid sending undeliverable SMS.

The next step is to select the date and time you want the program to run. Note that it is possible to schedule a program over multiple days, and is also possible to set different time windows for Sending and for Responding.
Select the list for your program. You can select more than one list. For example, you can include a target list and a suppression list.

Click on Submit when you have set all the parameters.
Note: You can add multiple schedules to the same program, just repeat these steps for any additional schedule. Programs will multiple schedules offer the ability to visualize and export results for all schedules combined or for each individual schedule.
Once the schedule is submitted, it will appear listed on a table at the Schedules page. Each schedule will have a series of possible ‘Actions’:

Settings
- Review Settings: check the schedule settings.
- Modify: use this button to modify any of the schedule settings.
- Delete: use this button to delete the schedule.
- Invalidate Previous Links/Sessions: invalidating and creating new links for “Send" and “Respond To” texts (see below).
Reports
- Results
- Live Agent Monitor: click here to access the real-time agent monitoring dashboard. From this dashboard you are able to visualize activity on your programs;
- Monitor agent responses and review conversation threads
- View agent productivity
- End a specific particular volunteer/agent session
- Block rogue agents
- Review flagged messages
- Analyze Delivery: use this visualization tool to track the delivery rate trend of your program. It shows the delivery rate per domain and per message.
Run
- Send Texts: press to access the page from which message will be sent. This is the URL you will distribute to the volunteer/agents tasked with sending the messages. The landing page is a sign-in page where volunteers/agents will login to start texting (no password is required). The personal information requested is used only to track the amount of messages each volunteer/agent sends. Anyone with this link will be able to send texts.
- Respond To Texts: press to access the page to respond to texts. This is the URL you will distribute to those volunteers/agents tasked with responding to any replies received. Anyone with this link will be able to respond to texts.
- Bulk Classify Initial Responses: this requires training from echo19, please contact us to schedule a training session.
Step 6: Viewing and Understanding Your Results
Once you start sending the messages you can view and export results at the program’s Results page. On this page you can view connection results and also export the data file by selecting Export Results To CSV.
Please note that there is a checkbox besides each connection result. This checkbox allows you to create a new list with the records selected. For example, if you wish to send a follow up text message to all the people that received your initial message, you could check the box for ‘delivered’ and then click on the ‘Create List From Selection’ button located at the right hand side menu. The system will automatically create a new list with those records. This list will be added to the available lists for this client and you will be able to create a new program to contact this specific group.

The Results page also includes delivery rate information by carrier. This information is helpful specially when monitoring the progress of programs that includes individualized links for survey or donor recruitment. When the delivery rate for the last 1,000 messages starts dropping it means that the carrier filters are starting to block the traffic coming from your program which is a good indication that it is time to rotate message and/or domain.
Additional Features
Visit: Acquiring Domains in echo19 for shortening urls
Please contact us at support@echo19.com if you have any question
